
Which brings us to our first topic. See that eight inch strip of jagged metal? If you're thinking to yourself "well, that doesn't look right" then you are correct. This is an easily missed point of wear. And even if you know it's worn, you don't know when it's going to fail until there's a loud bang and all of a sudden your wheel won't turn. I know because this picture is my front wheel, about 15 miles into what should have been a 35 mile ride. I knew my rim was worn, but I didn't know it was THAT worn. I found out the hard way. Fortunately, this happened at relatively slow speed on level ground. If I had been hauling ass down Germantown, the consequences would have been significantly more dire.
"How in the hell did that happen in the first place?" you ask. Well, friction. All bicycle rim brakes bring the wheel to a stop by pressing brake pads against the rim, and eventually they'll remove enough material that your rim is too thin to resist the pressure of your tire. It does take time, but maybe less time than you think. We have high mileage year round riding customers who can burn through a rim sidewall in about a year, but that is definitely the exception. Most people will take several years to get to that point, and often wheels meet a speedier end at the hand of potholes, curbs, or rampaging Tri Met buses.
"So how can I tell when my rim is about to explode" Well, like I said, it's tough to tell with any precision. Run your finger over the rim sidewall. It should feel flat and fairly smooth, without any concavity or grooves. Rims that are severely worn could double as a soup bowl. On the topic of grooves, some rims have wear indicators that can take the form of a groove running the circumference of the rim, or less commonly a dimple or divot in the brake track. The idea here is that when the sidewall is worn to the point you can't see or feel the wear indicator, it's time to replace it.
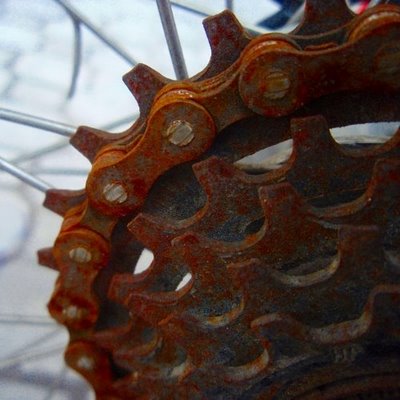
"So, what about my chain? I put lube on it once or twice a year. Is that too much?"
Not if it looks like this it's not. On the face of it, chain lubrication is pretty straightforward, and it is. Sort of. Opinions vary on how often you should lube your chain, but I have found it's best not to think of it in terms of time. This is Portland after all, and if you ride year round, you are gonna need to lube your chain a hell of a lot more frequently in January than in July. I have two basic rules of thumb for when to lube a chain. One is when the chain (unless it's really new) looks bright and shiny, especially the part that rides over the gear teeth. The other is if it's making noise. This is impossible to miss after very long. When you pedal, a well maintained bike should make very little noise. It shouldn't be totally silent, but it shouldn't squeal like a hinge in a haunted house either. If it does, lube that bitch!
Of course, the flip side to having a dry, rusty chain is having a gooey, nasty chain that has an entire bottle of lube on it. If your chain has so much lube on it that it's spraying off of your chain and onto your frame and rear wheel, it's WAY too much.
"Alright wise guy, how the hell do I lube my chain then?"
Basic lube procedure, assuming your chain is moderately dry and needs it.
1. Lean your bike up against a wall so you can pedal the cranks backwards smoothly.
2. Pinch a rag loosely over the chain and pedal backwards a dozen or so times until the excess gunk is off the chain.
3. Pedaling backwards, direct a LIGHT stream of lube onto the chain. Ideally, you would put 1 drop on every roller, but most of us aren't this anal. Use a drip lube, not a spray. Much neater.
4. Pedal backwards for a minute or so to help it all soak in.
5. REPEAT STEP 2! This is to remove excess lube. That gooey gross chain I was talking about earlier? This is to keep that from happening.
"So what kind of lube should I use?"
Oh, crap I wish you hadn't asked that. There approximately 150,000 brands of bike chain lubricant on the market, designed for all different types of conditions. They have chain lube specially formulated for vegan dog owners for chrissakes. If in doubt, ask your LBS (ideally these guys) what they recommend. The important thing is to use a lube designed for bike chains. The type is much less important. Anything (well, almost anything) is better than nothing. I say this as a guy who used olive oil on his chain on a mountain bike trip when I forgot to bring any tri-flow. And, yes it worked fine.
"What shouldn't I use on my chain?"
Now that's a much easier question.
1. Olive oil. Don't be that guy.
2.Grease. Lube and grease are not interchangeable. Lube is thin (like olive oil!) grease is thick (like peanut butter!)
3. Peanut Butter. While delicious and kinda greasy, it's a poor lubricant.
4. Motor oil. Seriously? Unless your bike has a motor. Then, knock yourself out!
5. WD-40. Every garage in America has a can of WD-40 in it somewhere, so it's tempting to put it on your chain if you don't have anything else, but it's a solvent, not a lubricant.
"What do you mean my chain is worn out? It looks fine to me!"
Yes, chains do wear out. And no, you can't tell just by looking at it. Here in the shop we have a nifty tool that measures chain wear, commonly referred to as "stretch". Chain wear is dependent on multiple factors, including how many speeds the drivetrain has, frequency of lubrication, and riding conditions and style, but expect to get around 1,000-1,500 miles out of a chain. I know this sounds like a lot, but say you ride 50 miles a week, not that much for a daily commuter. That's only 20-30 weeks, not even a year. We try and replace chains before they are 100% worn out, because after a certain point they start to wear out the rest of the drivetrain, especially the freewheel or cassette (the rear gears) but eventually the the chainring(s) as well. This starts getting expensive. If you replace your chain in a timely fashion, the rest of your drivetrain will last much longer, and shift much better. If you're serious about chainwear, get one of these.
Want more info on chain maintenance? Click this link.

"I have those weird French valves on my bike. What's up with those?"
Which brings us to tire inflation. Seems like a no brainer, and it's definitely not complicated, but there are a few things to know. The valve on the right is a Presta, sometimes known as a weird French valve. It's a pretty simple device, but is disproportionally baffling to many people. The key is the little nut at the tip. Whether you want to put air in, or let air out, unscrew this nut all the way, do your thing, then close the nut.
As for actual inflation, the problem most people have is not checking their pressure often enough. If you're riding regularly, I tell people to check their tires at least every 2 weeks, though once a week is better. Take a look at the sidewall of your tire and find the pressure in PSI. Trust me, it's there somewhere. Most will give you a range, some only a maximum. If you're riding on the street, go for the max or 10-20% less if you want a little more cush. You own a pump, right?
And that's it! Well, not really. There is an almost infinite amount of stuff to know about bikes, but that covers a few of the more common maintenance issues we see here in the shop. If you ever have any questions, feel free and stop by, and we'll do our best to help!
Here are a couple of links if you are interested in learning more about bike maintenance.
http://www.sheldonbrown.com/
http://www.parktool.com/blog/repair-help
No comments:
Post a Comment